 Under use and stress after riding, gears lose their accuracy and rides become extremely noisy and unpleasant when your bicycle chain struggles to change between gears. With simple tools and know-how, this guide covers how to tune your front and rear derailleur to get back the accuracy and efficiency.
Common issues faced include gear shifting that is unresponsive, loud noises by the chain or the chain dropping (shifting too much and falling off the cassette.)
The following steps will help rectify:
– Making fine tuning adjustments to the front and rear derailleur
– Re-indexing the shifters. Re-indexing means tuning the distance that the derailleur moves after the gear is engaged, or after every ‘click’. This will make sure the chain is pushed enough by the derailleur to shift to a different gear without any problem.
*Do note: The tuning shown below was on a road bike with drop-style shifters. Other shifters and bikes will work similarly.
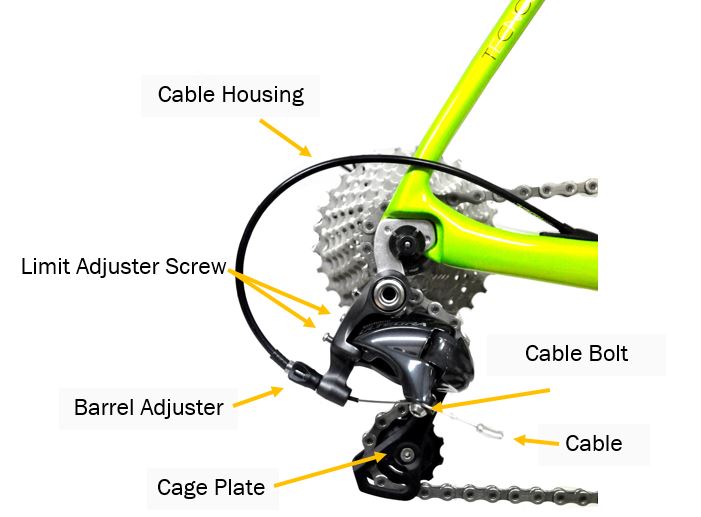
Step 1: Adjusting the index of the rear derailleur
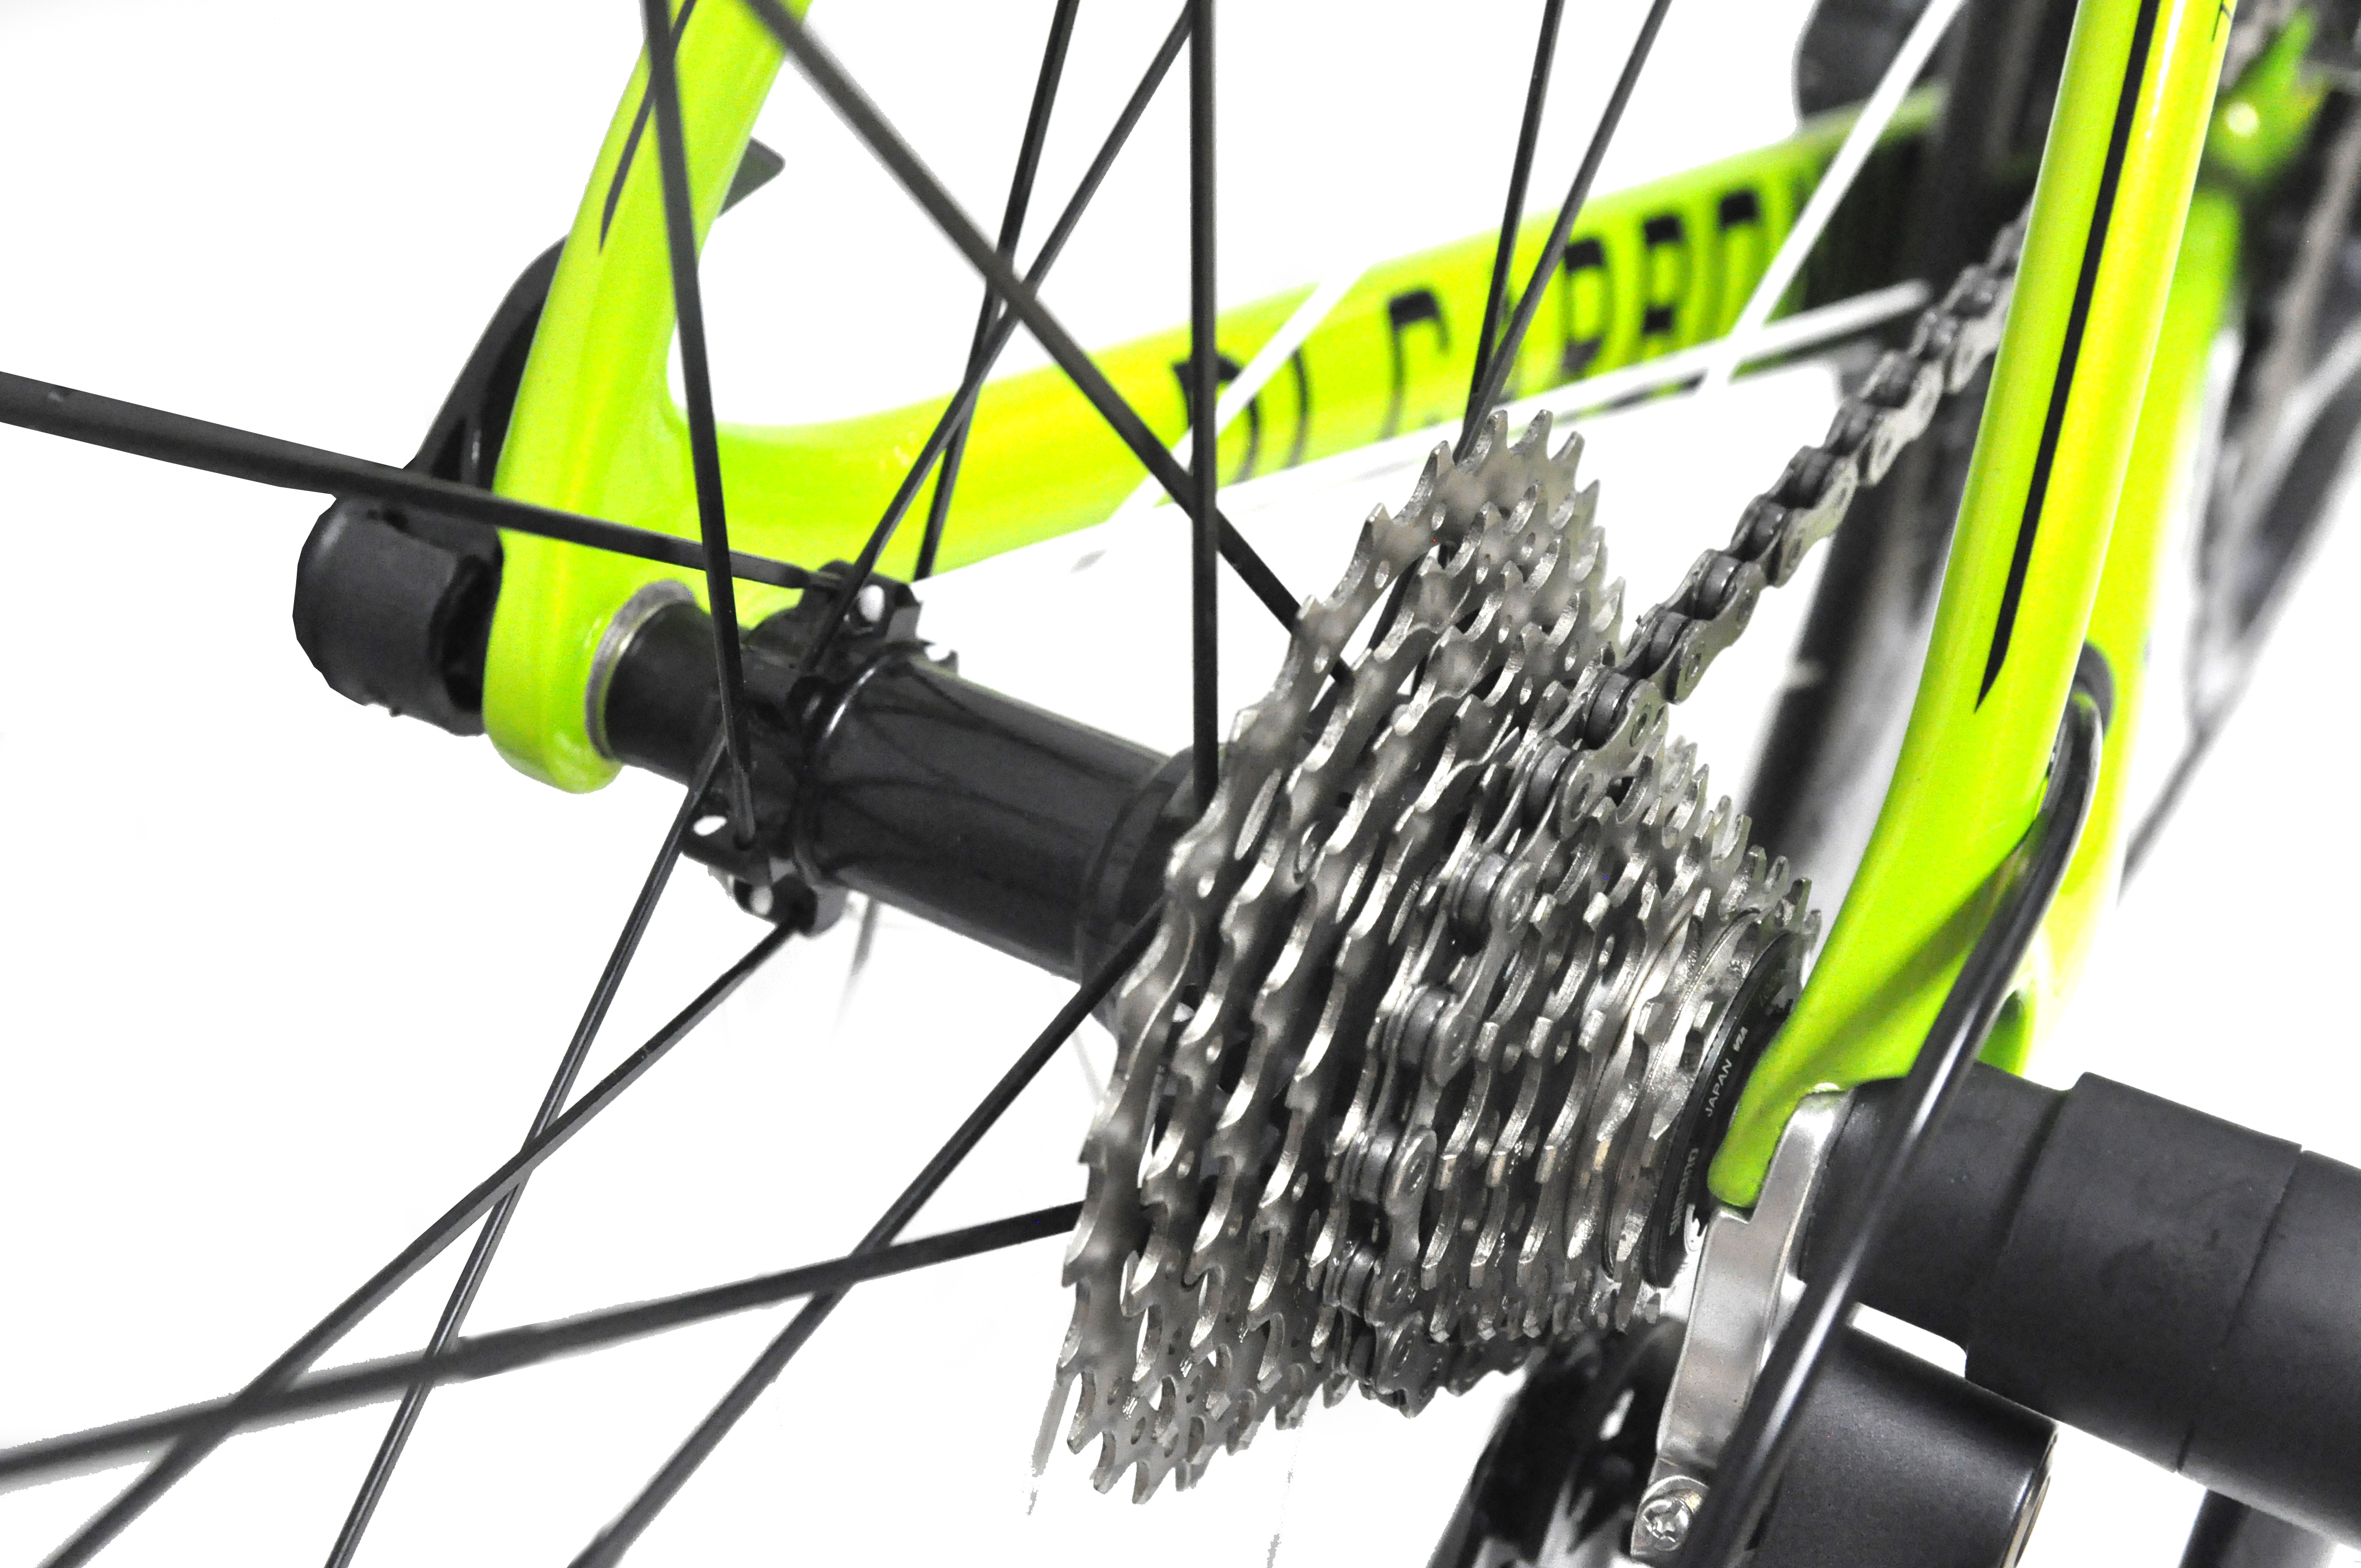
This step will help to re-index the rear derailleur. Place your bike on a mechanic clamp or bike stand so that you are able to spin the rear wheel and change gears. Shift the rear derailleur to the smallest (outermost) gear, and the front derailleur to the biggest gear (outermost).
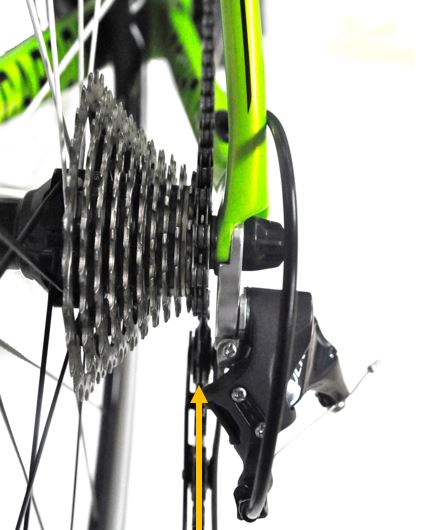 Next, turn the barrel adjuster inwards all the way (clockwise).
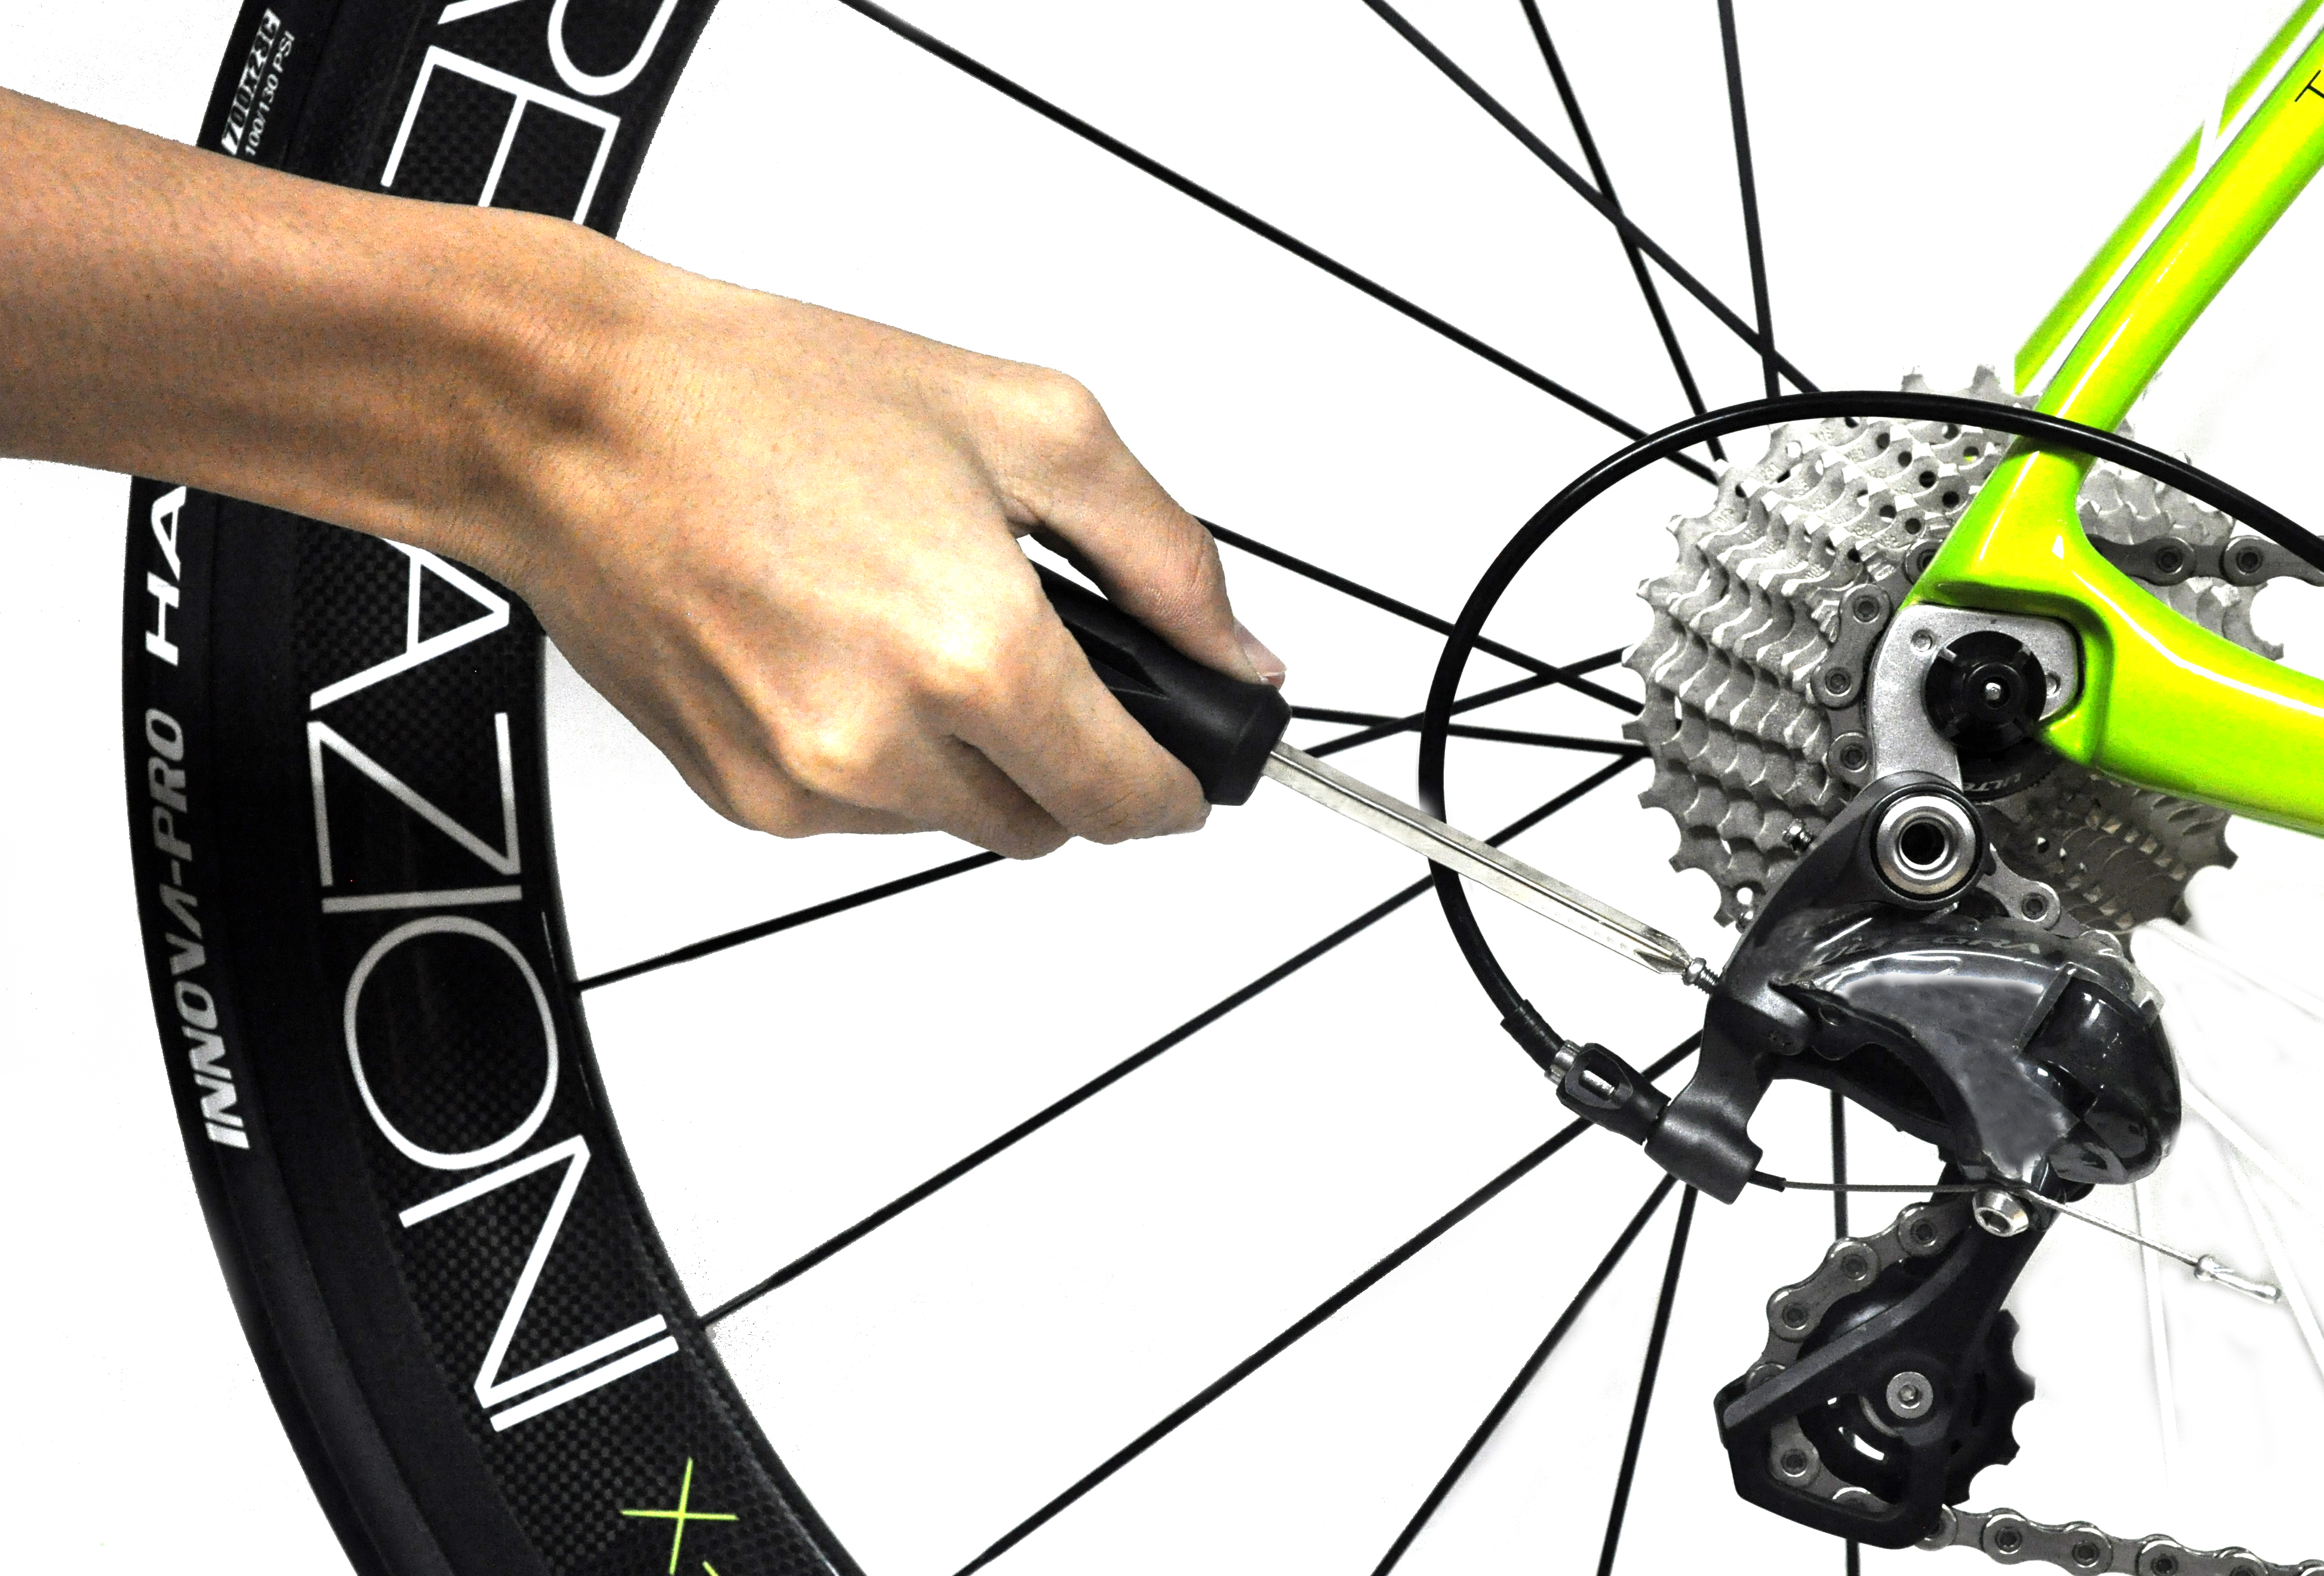
 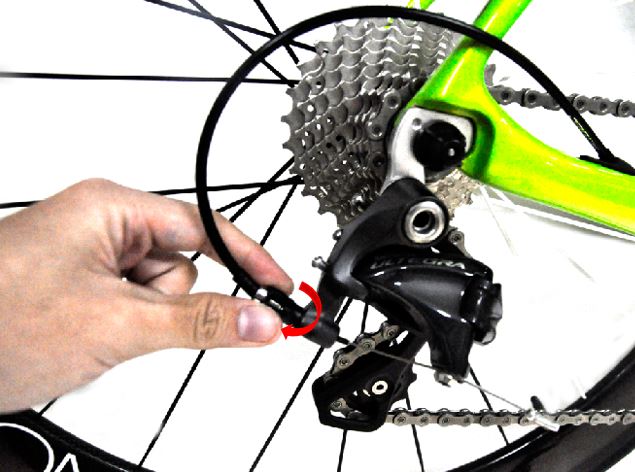 Using an Allen key, turn anticlockwise to release the cable bolt on the rear derailleur, this will loosen the entire cable from the derailleur and allow you to move the derailleur manually and set the index.
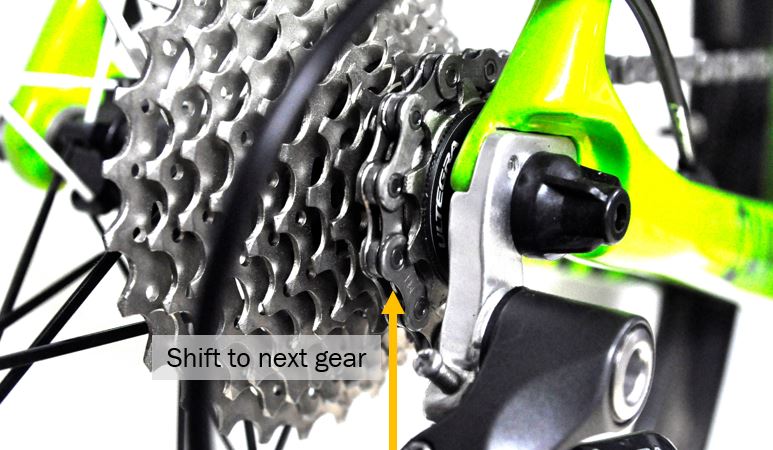
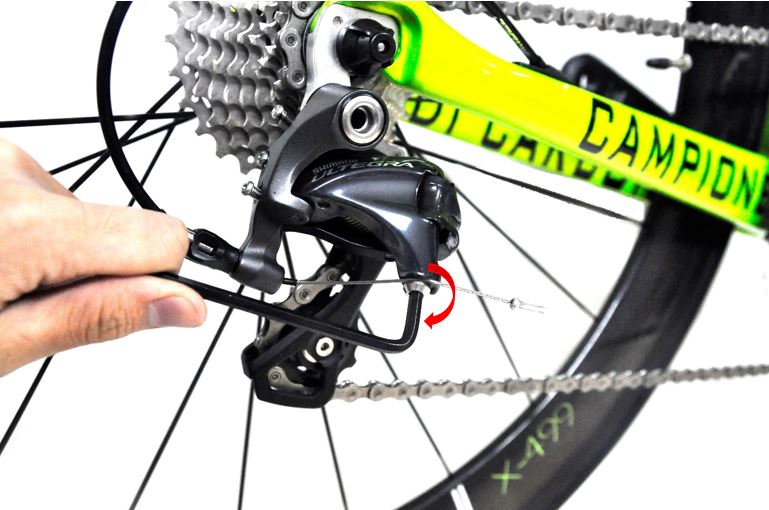 In order to set the index of the rear derailleur, start pedaling gently by turning the front pedal and chain-wheel. lightly push the rear derailleur inwards until the chain shifts up to the second smallest gear.
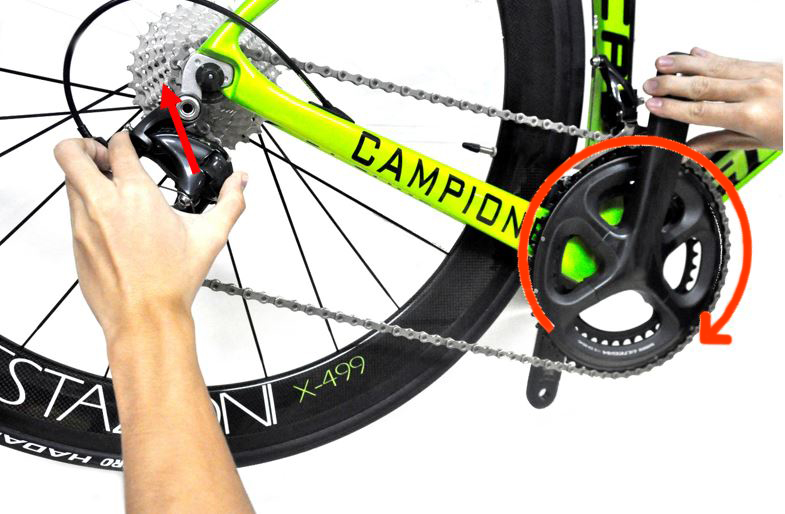
 Once the derailleur has shifted to the second gear, hold the position of the derailleur and pull the cable taught and fasten the cable bolt in place with an Allen key.
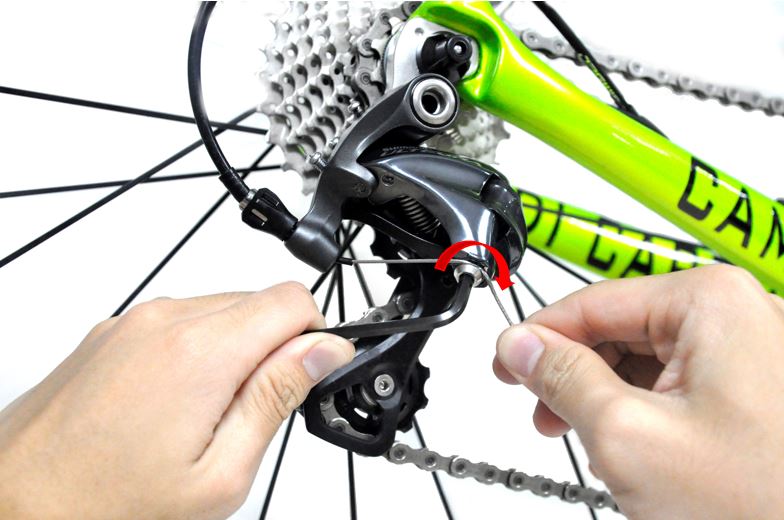 Do some test shifts and shift make sure the chain is able to run smoothly on all of the rear gears/cassette.

 If shifting is not fully responsive, make adjustments to the barrel adjuster by turning it anticlockwise to make the cable tension higher.
Next, shift the front derailleur to the smaller chain-ring (inwards), and shift the rear derailleur to the middle gears.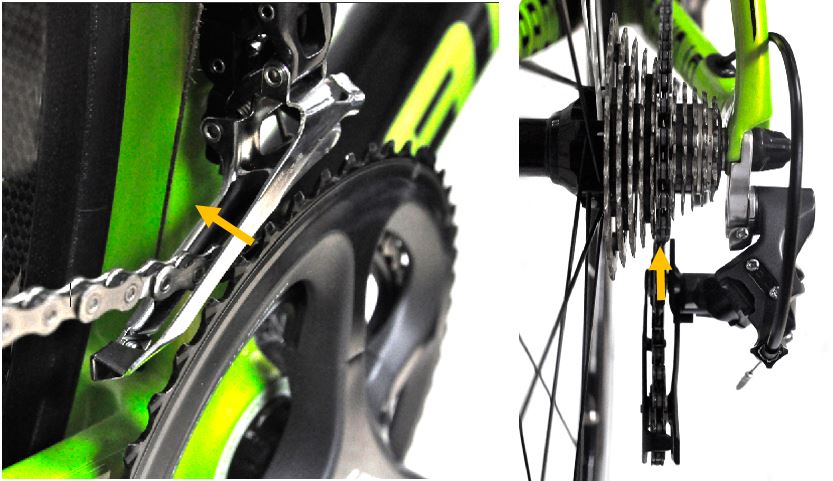 Turn the barrel adjuster clockwise to slacked the cable tension.
 Using an Allen key, tighten the access slack cable by pulling the wire taught and tightening the cable bolt.
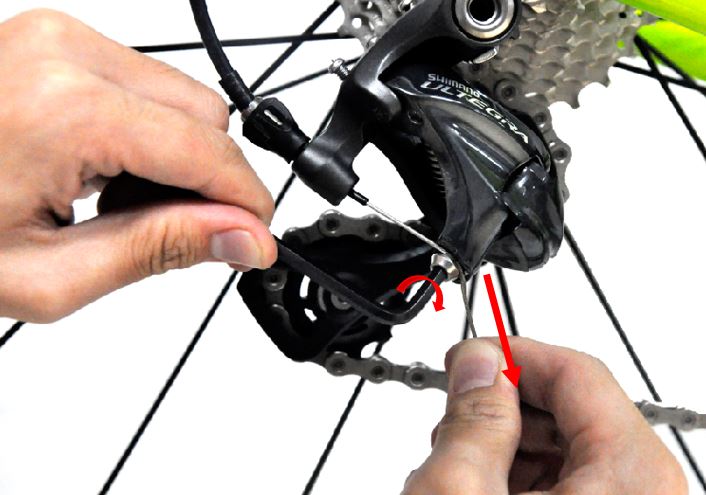 Continue doing test shifts and ensure that the chain is able to shift up to the largest rear gear. If shifting is unresponsive, tighten the barrel adjuster in small increments. Remember to test up-shifting and downshifting with both the large and small front chain-wheel. Once the shifting is clean ad precise, you have successfully indexed your shifters!
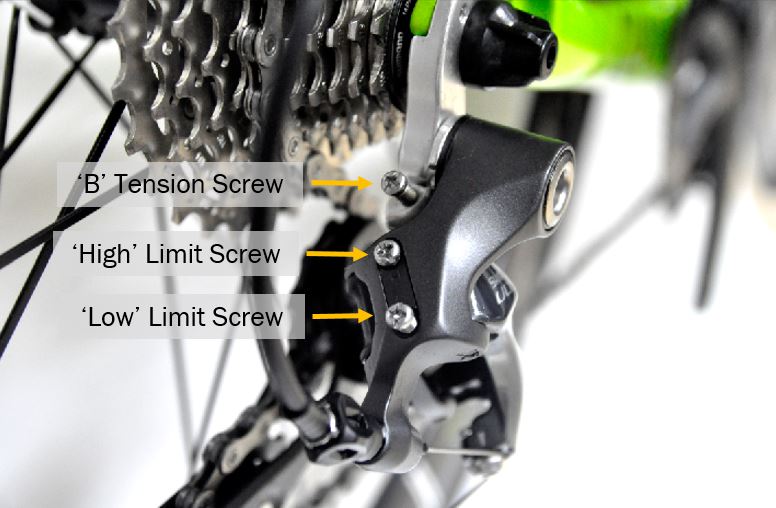
Setting the limit adjustment
The limit screws on the front and rear derailleur act as ‘stoppers’ to prevent the derailleur from over shifting. If the derailleur over-shifts, the chain may exceed and drop of the chain-wheel. A chain drop while riding may lead to accidents, so it is essential to set the limit screws right.
(H Limit) Rear Derailleur Limit
 Step 1: Shift the front derailleur to the largest chain-wheel and the rear derailleur to the smallest gear. Turn the barrel adjuster clockwise to eliminate the cable tension.
 Step 2: Pedal the bike and pull the cable wire to manually shift the chain to the second outer-most gear. While still turning the pedals, release the pull on the cable to let the chain shift back to the first outermost gear. If the shifting to the outermost gear is smooth and effective, tighten H-screw 1/4 turn clockwise and repeat the shift. Continue shifting to the second outer gear and tightening the H-screw by 1/4 turn increments until the H screw has reached its limit. The limit is reached when the chain becomes too close and starts rubbing against the cog.
* Turning the H screw clockwise will bring the derailleur inwards, anti-clockwise will bring the derailleur outwards. The derailleur should be inline with the outer most gear.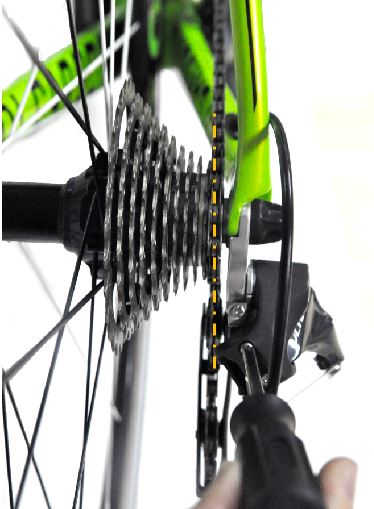
(L Limit) Rear Derailleur
The L screw prevents the derailleur from moving towards the innermost gear (near to the spokes). If the L limit is not set properly, the chain may over-shift and touch the spokes which may cause damage to the wheel.
Step 1: Shift the front derailleur of the bike into the smallest chain-ring and the rear derailleur to the second-innermost gear.  Step 2: Similarly, pedal the bike and pull the inner wire by hand and manually shift the derailleur inwards to the innermost gear.
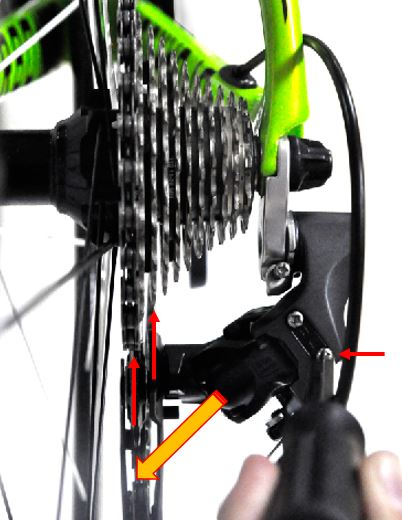 Pull inner wire by hand to shift derailleur sprocket inward. If the gear shifting is acceptable, tighten the L screw 1/4 of a turn clockwise. Continue repeating the manual shifting from the second to the most innermost gear until the screw is over-tightened. If there is a delay when shifting or the chain makes a loud rubbing noise, this means that the L screw has been over tightened. Simply loosen the L screw 1/4 a turn anticlockwise to set the desired L limit.
* Turning the L screw clockwise will bring the derailleur outwards, anti-clockwise will bring the derailleur inwards.